Hi there, and welcome to my first edition of "Yep, I Made that." I'll use this title to post about the non-card things that I make, most of which will be inspired or directly copied from things I found on Pinterest.
Today's Yep, I Made That item is a magnetic make-up board. My BFF shared this idea with me as a way to get my make-up off the counter and make it more visible. This is great, because I have been in a rut using the same 3 or 4 items for the past few years because I'm too lazy to dig to the bottom of my make-up bag, pull out a grimy, powdery mess, rub the label to see what color it is, throw it back in, start rummaging again, rub my face, only to find that all the loose, powdery mess from inside my make-up bag got all over my fingers and is now smeared all over my face, wash my face, and start all over again. Phew! This way, all of my make-up is clean, visible, and most of all, accessible.
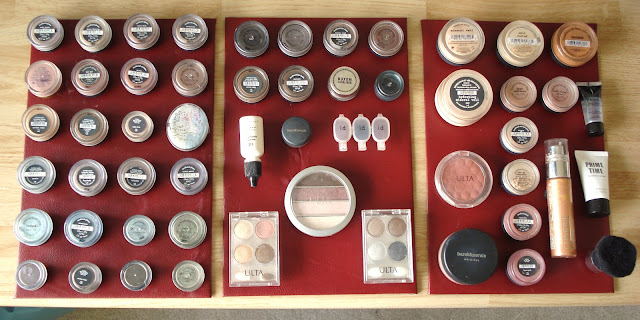
Here's what I made:
OK, so this is the final product, but not mounted on my wall, yet. I wanted to see how all of my products fit on the sheets before I nailed them to a wall.
So how did I make it? Well, I went to Home Depot and bought 3 pieces of flashing in the roofing department. It's a thin sheet of metal, of what kind I have no idea (I did have to make sure that the flashing was magnetic, though), and about 60 magnets. The flashing cost $0.88 each, and the magnets were $2.99 for 8 (although you might be able to find magnets for less at a dollar store or something). Total cost of my project so far is about $27.
I took it home, and using my handy-dandy glue gun and some left over fabric (OK, well mine was actually dark red vinyl), I hot glued the fabric to the flashing. I just folded the fabric over the edges, glued it down, and voila! Cost for this step: $0!
I then hot glued a magnet to either the top or bottom of each of my make-up products, depending on what I wanted to see. Because most of my product is the same brand with an opaque black lid, I decided to glue them on bottom-out so that I could see the product and color name from the front of my board. Some items took 2 magnets to stick on (actually, the only thing that took 2 magnets was the tubular Clinique body shimmer, far right).
I decided to organize my items by product type. On the far right I have everything for complexion and face, including my mini-buki brush. Concealer, foundation primer, foundation, blush, bronzer.
In the middle I have eyeliners, liner-setting liquid, and a few shadow pallets.
On the far left is eye shadow. All eye shadow. Yep; I have a lot. Funny, considering I haven't really worn any in about 3 years...
Here's a close-up of my FACE board:
Here's a close-up of my LINER & SHADOW board:
And here's a close-up of my EYE SHADOW board.:
I got my hubba-hubba Hubby involved, and he measured and leveled and mailed the darned things to the wall above my towel bar!
So the total cost for my project was just the flashing and the magnets for a whopping $27. Now all I need is better lighting in my vanity to clearly see what I'll end up putting on my face!
Cheers!


Ooh looks amazing BFF!!
ReplyDeleteAwesome idea! Just remember to remove the magnets once the makeup is gone...save you from another $27. Sweet idea, though! Wahoo!
ReplyDeleteAwesome idea! Just remember to keep the magnets when the makeup is gone. Red leather is SO YOU!
ReplyDeleteOk, I don't know what the deal is with the names....sorry for all the posts.
ReplyDeleteVery cool! Nothing is powdery to spill out when open? I don't think I've owned that much make up in my entire life! If I had, it would have had to be waaaay out of reach from you - good thing you had your own to play with! : )
ReplyDelete