Saturday, March 31, 2012

Embellish Magazine Challenge - Jeweled


Hi folks! As part of my challenge to myself for 2012, I decided to try to participate in more card challenges. So I stumbled upon this challenge today over at Embellish Magazine.

The challenge was to create a card or project using not only the color scheme in the inspiration photo, but also to incorporate some kind of jewels or bling into your project. Here's the inspiration photo:

Such pretty colors! Those are colors that make me drool all the time, whether together or individually. In fact, I'm wearing a shirt in that lovely aqua color this morning, so it was meant to be. :-)  (I used PTI Hawaiian Shores, White, and Soft Stone paired with SU Wisteria Wonder and Pool Party).

I decided to bust out my Upsy Daisy set from Stampin Up and make a tiled flower scene. I had done a card similar to this once before, but it had been a while, so I thought it was about time to try my hand at it again. I stamped the flower image 3 times using VersaMark, once each on a different colored card stock background, then embossed the image with white embossing power. Then I cut each image in thirds, and selected one tile from each color to reassemble into the original image. As I had 3 sets of images to work with, I rearranged them 3 different ways for 3 different looks.

This first card is very bright and cheerful and makes me think that it would make a nice wedding card. I just love the colors together. I added a few pearls at the base of the large flowers and used my diamonds impression plate (PTI) for a white-on-white matting to complete the look.

The next card I wanted to be bright and cheerful, so I used a silver matting for the flower tiles, and set that on more Hawaiian Shores to really make the brightness stand out. Matted that on Soft Stone on a white card base, added some bling and a vellum sentiment strip, and voila! I also added some Stickles lavender pearls to the base of each blossom, but I'm not loving that, so pretend that's not there, OK? In fact, I don't love the vellum strip, either. Maybe I'll remove that and stamp right on the Soft Stone card stock.


And lastly, I wanted a card that would be a bit more somber, something that could be used as a sympathy card. I set my flower tiles on Smoky Shadow (although in the photo it appears black) and matted that on Wisteria Wonder which has a lovely greyness to it. The card base is soft stone so that it wasn't too bright, and a few simple rhinestone brads add the finishing touch.


So there you have it. Three cards, all with the same colors and images, but arranged in ways that make the overall effect of the cards very different. This was a really fun project to try and I'm happy with the results. Each card has a very different mood and evokes different emotions from me, which is exactly what I was hoping to accomplish. I'm going to pat myself on the back for this one. Maybe Hubba Hubba Hubby can pat me on the back here, too. :-)

Happy weekend!

Thursday, March 22, 2012

Cards, cards, cards!

Hi there! This is just a massive post for a bunch of cards that I've been making lately. Admittedly I'm better at making cards than I about about blogging. Sorry, folks, that's just what you get. Besides, who wants to read my mumbo-jumbo anyway?

Well, this first card is for the A Passion For Papertrey's "House and Home" challenge. The challenge wansn;t specifically to make a new house card, but to use something that is home-related. So naturally I went right to my new Lighten Up set from my last PTI order. I thought it'd be neat to see a bunch of lamps turned off, then BAM! One big, bright light at the end of the row. Here's my interpretation.


Here's a little number I made using the partial die-cut technique that I learned here today:

And here's a card that desperately makes me yearn for summertime and watermelon.

And another one using the same layout as above. Stick with what works, right?

 And lastly, a CASE of Maile Belles' card found here.

Friday, March 16, 2012

Yep, I Made That - Magnetic Make-Up Board

Hi there, and welcome to my first edition of "Yep, I Made that." I'll use this title to post about the non-card things that I make, most of which will be inspired or directly copied from things I found on Pinterest.

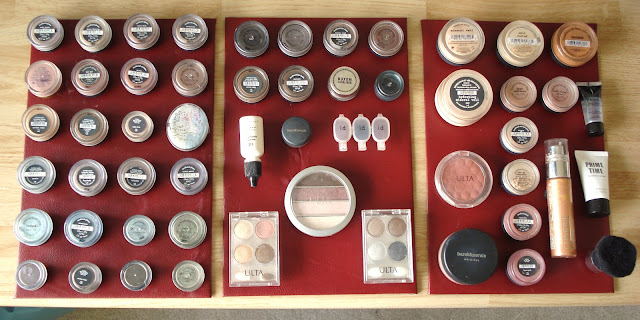
Today's Yep, I Made That item is a magnetic make-up board. My BFF shared this idea with me as a way to get my make-up off the counter and make it more visible. This is great, because I have been in a rut using the same 3 or 4 items for the past few years because I'm too lazy to dig to the bottom of my make-up bag, pull out a grimy, powdery mess, rub the label to see what color it is, throw it back in, start rummaging again, rub my face, only to find that all the loose, powdery mess from inside my make-up bag got all over my fingers and is now smeared all over my face, wash my face, and start all over again. Phew! This way, all of my make-up is clean, visible, and most of all, accessible.

Here's what I made:


OK, so this is the final product, but not mounted on my wall, yet. I wanted to see how all of my products fit on the sheets before I nailed them to a wall.

So how did I make it? Well, I went to Home Depot and bought 3 pieces of flashing in the roofing department. It's a thin sheet of metal, of what kind I have no idea (I did have to make sure that the flashing was magnetic, though), and about 60 magnets. The flashing cost $0.88 each, and the magnets were $2.99 for 8 (although you might be able to find magnets for less at a dollar store or something). Total cost of my project so far is about $27.

I took it home, and using my handy-dandy glue gun and some left over fabric (OK, well mine was actually dark red vinyl), I hot glued the fabric to the flashing. I just folded the fabric over the edges, glued it down, and voila! Cost for this step: $0!

I then hot glued a magnet to either the top or bottom of each of my make-up products, depending on what I wanted to see. Because most of my product is the same brand with an opaque black lid, I decided to glue them on bottom-out so that I could see the product and color name from the front of my board. Some items took 2 magnets to stick on (actually, the only thing that took 2 magnets was the tubular Clinique body shimmer, far right).

I decided to organize my items by product type. On the far right I have everything for complexion and face, including my mini-buki brush. Concealer, foundation primer, foundation, blush, bronzer.

In the middle I have eyeliners, liner-setting liquid, and a few shadow pallets.

On the far left is eye shadow. All eye shadow. Yep; I have a lot. Funny, considering I haven't really worn any in about 3 years...

Here's a close-up of my FACE board:


Here's a close-up of my LINER & SHADOW board:

And here's a close-up of my EYE SHADOW board.:


I got my hubba-hubba Hubby involved, and he measured and leveled and mailed the darned things to the wall above my towel bar!


So the total cost for my project was just the flashing and the magnets for a whopping $27. Now all I need is better lighting in my vanity to clearly see what I'll end up putting on my face!

Cheers!

Friday, March 9, 2012

Cards, coffee, and boots

Happy Friday, all! I'm super excited for my fun weekend ahead and all of the crazy memories that I'll make. What am I doing, you ask? Why, I;m taking two classes at the Academy of Burlesque! Miss Indigo Blue (who you might have seen in the documentary available on Netflix 'A Wink And A Smile') opened up her studio in Seattle several years ago, and I am so anxious to go to two of her classes with my gal Stephanie this Sunday! Tomorrow we're making our own tassel pasties, which will undoubtedly be a hoot!

But enough of that for now. I'll let you know how it goes next week.

First is my pop of color card for the A Passion For Papertrey  challenge. This fortnight's challenge was to make a card using only black, white, and a pop of color. So here's my happy hearts coffee card.


My color was SU! True red, and I think the hearts really make that coffee cup just POP right outta the screen and into your heart. :-)

Here ar3e a few other coffee cards that I made with this new PTI set that I'm absolutely in love with. This is a gift card holder. The front flap tucks in behind the matting on the front to hold it closed.

Open the flap and it looks like this:

And inside there are 2 pockets - 1 to hold the gift card, and the other on which to write your note!

I couldn't resist the woodgrain impression and the felt coozy on this cart.

 And here are the new boots that came in today's mail from Zappos.com. I ordered them yesterday and asked for the free 3-5 day shipping. NEXT DAY! Love it. This pair has some sassy lacing up the back. The shoe is leather but the boot shaft is suede. Oh so luscious!

 Side view:

And here's the other pair that I ordered. All leather, a little less-dressy, but still fabulous. How is a girl to decide? Oh the choices...

Well that's it for me today. Have a great weekend!